Building a DIY Hydroponics System Using Gutter Downpipes and a Water Pump: Growing Lettuce and Spinach
In this blog post, I’ll take you through the step-by-step process of creating a simple yet effective hydroponics system using gutter downpipes and a water pump to grow fresh lettuce and spinach. Hydroponics offers a space-saving and efficient way to grow plants without soil, making it ideal for urban gardening or indoor setups. Let’s dive into the details of how you can build your own hydroponics system at home.
Materials Needed:
- Gutter downpipes (PVC or similar)
- Water pump
- Net pots or cups
- Growing medium (such as clay pebbles or rockwool)
- Nutrient solution
- Timer (optional)
- Drill or hole saw
- PVC glue
- Hose and fittings
- Lettuce and spinach seedlings
Step 1: Prepare the Gutter Downpipes
- Cut the Downpipes: Start by cutting the gutter downpipes into sections of suitable length for your setup. These will act as the main channels or tubes for circulating water and holding the plants.
- Drill Holes for Net Pots: Using a drill or hole saw, create evenly spaced holes along the length of the downpipes. The size of the holes should accommodate the net pots or cups where your plants will be placed.
Step 2: Assemble the Hydroponics Setup
- Set Up the Reservoir: Position the water pump inside a large reservoir or container filled with the nutrient solution. The pump will circulate the nutrient-rich water through the system.
- Connect the Downpipes: Arrange the cut gutter downpipes in a sloping or vertical position, ensuring that one end is lower than the other to allow for water flow. Connect the downpipes securely using PVC glue or fittings.
- Install Net Pots: Place net pots or cups into the drilled holes along the downpipes. Insert the lettuce and spinach seedlings into the net pots, ensuring they are stable and supported.
Step 3: Set Up the Water Pump
- Attach Hoses: Use hoses and fittings to connect the water pump to the top end of the gutter downpipes. This will allow the nutrient solution to be pumped up and circulated through the system.
- Adjust Water Flow: Adjust the water pump settings to achieve a steady flow of nutrient solution through the downpipes. You can use a timer to automate the watering cycles for optimal plant growth.
Step 4: Monitor and Maintain the Hydroponics System
- Check Nutrient Levels: Regularly monitor the nutrient solution levels in the reservoir and top up or replace it as needed to ensure the plants receive adequate nutrients.
- Monitor Plant Growth: Keep an eye on the growth of your lettuce and spinach plants. Ensure they are healthy and thriving in the hydroponic environment.
- Clean and Maintain: Periodically clean the system to prevent clogs or algae buildup. Maintain the water pump to ensure optimal performance.
Benefits of DIY Hydroponics Using Gutter Downpipes:
- Space Efficiency: Gutter downpipes allow for vertical or compact horizontal setups, making efficient use of space.
- Customizable and Affordable: This DIY approach is customizable to suit your space and budget, using readily available materials.
- Water Efficiency: Hydroponics systems use less water compared to traditional soil-based gardening.
By following these steps, you can create a functional hydroponics system using gutter downpipes and a water pump to grow fresh and healthy lettuce and spinach at home. Experiment with different varieties of plants and adapt the setup to meet your gardening needs.
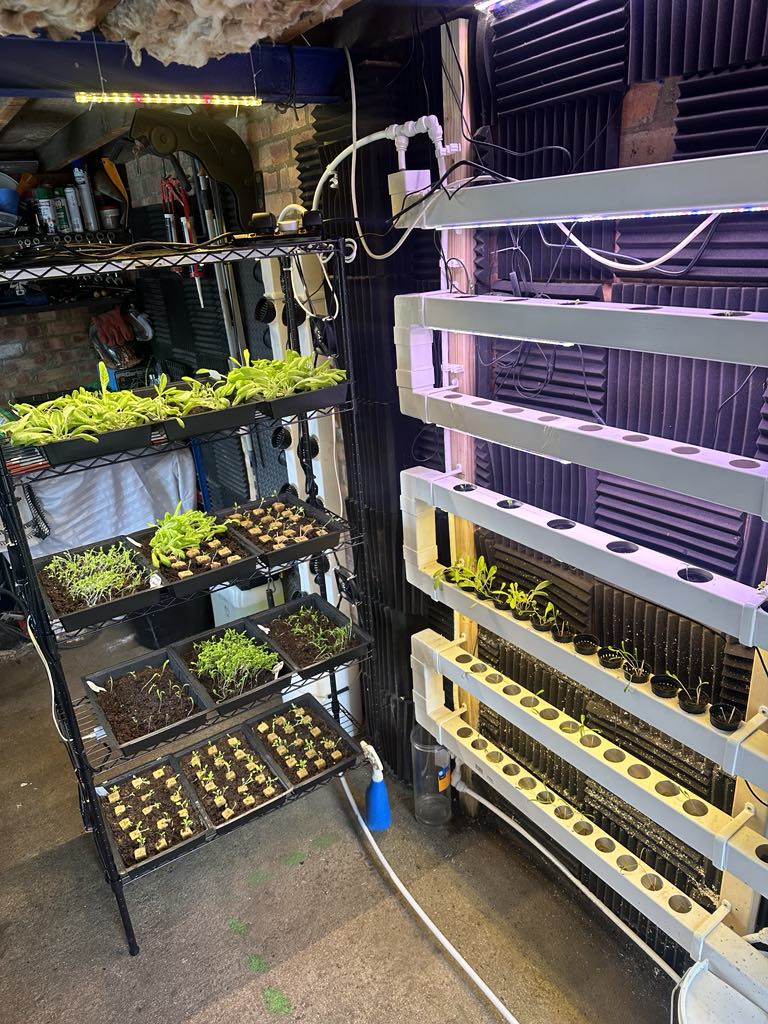
How we did it…
We bought a number of gutter downpipes, connected them together in a sort of ‘donkey kong’ formation to allow the water to run down, into a bucket and the submersible water pump, pumps the water back up and around and around it goes. This way is saves 80% of water. We used cheap led lights from amazon with a broad spectrum colour but if doing it again, we would use T5 lights.